Definition List

25 Feb 2014

Customize folders with different colors in Windows

There are many softwares available today over the internet which can Customize your Computer in an efficient manner that it looks so attractive as well as it becomes very easy to use. We always want our computer to be clean and well organized so that whenever we need to access something or need to search a particular file/folder in our computer we could find it easily.
As similar to that, here I am going to share a software through which you can easily assign your favorite colors to your desired folders in order to differentiate them easily and to ease of access.


How do i Customize folders with different colors ?


Just follow the two simple steps given below to customize your folder :

Step 1 :First of all Download and install the software Folder Colorizer. It is tested and 100% virus free. You can download it from here 

Step 2 :

Now after installing the software, simply right click on any folder which you wish to customize. Here when you right click on folder, you will see a new option in the context menu i.e. Colorize !. Now simply go to that option and one submenu will appear. Now choose any color you want to assign to this folder.
Although it is a free software for everyone to use it but while you will use this software for the very first time , it will just ask your email id for activation of this software. But no need to worry because you wont need to confirm the activation by logging in to your e mail account. Even if you don’t wish to share your e mail id with developers of this software you can do it because product will be activated automatically once you enter any email id. So you can also enter any fake id if you want.
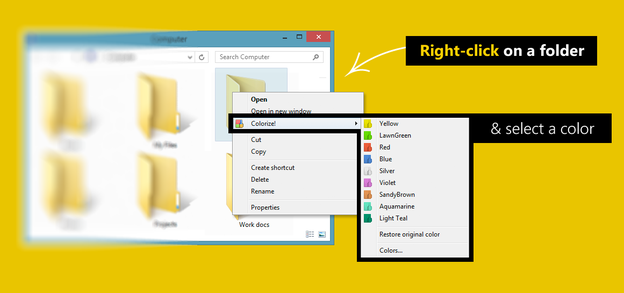
For your convenience I am providing you a screenshot of above mentioned procedure for changing folder color :

In this way you will be able to easily organize folders in any of your drive weather C: , D: or any other drive. You can also assign different colors to several folders in the same drive to give it more attractive and cool looks.

Increase battery life of your laptop-How to Guide

Every laptop or Netbook user these days have the same headache of limited backup time of batteries. As far as your system is new , you will have a good backup time but when it becomes a few months old you will definitely face problem oflimited battery life.
So here I am giving you a solution to Increase battery life of your laptop upto a sufficient extent.
There is an inbuilt command in your computer to Increase battery life as well as the performance of the system but not all users are aware of it. Some laptops directly provide an interface with option termed as “ POWER SAVING MODE ” but  if your laptop is old or don’t have this feature by default , you need not to worry because you can do the same task manually.
If you have a laptop with Windows 7 installed, you can use the ‘powercfg‘ command . It will display useful information about your laptop’s energy consumption and usage. If  you can understand and maintain  it correctly then you can extend your Battery life and performance by great amount.

Steps Increase battery life of your laptop

Step 1: Click on the Start Menu and type “ CMD ” in the Start Search bar.
Step 2: The search will start and it will then display an icon of “ CMD ” . simply right click on it and select Run as administrator.
Step 3: It will open command line, now simply run the command “powercfg -energy” without quotes. (For windows 7 users.)
Windows 8 users can Simply run the command “powercfg /energy” without quotes.
Step 4: Now Press “Enter”.
Once you successfully execute this command , Windows  will run a complete scan of  your system and it will find some ways to improve performance and power efficiency.
The results of this process will be saved to an HTML file, which is commonly  present  in the “System32” folder of most of the systems.
To access this file, simply follow the path which will be displayed in command prompt window after completion of the command. Read This file to understand that what program in your system is consuming more power and degradingthe performance. Fix the Problem to Increase battery life of your laptop.

Some More Usefull Tips to Increase battery life

§  Eject or Remove External Devices like Pendrive/DVDs/External HDD if not in Use
§  Run Apps that don’t Eat up much RAM
§  Disable Bluetooth of your Laptop if not in use.
§  Reduce Screen Brightness, This takes away lot of your battery, Reducing Brightness will help
§  Turn of Internet if you are not using it.
§  Make sure your Laptop’s Temperature remains Low
I am quite sure Performing these Tasks will help you to Increase battery life of your laptop.

Ghost keyboard Typing-Make Notepad type Automatically

Hey guys , Today I am going to share with you a Short but Cool notepad trick. You can show it to your friends and surprise them. Basically it is a prank that you can do with anyone just for fun.
This Process is Also known as “ Ghost Keyboard Typing ”


Just follow the simple steps to Learn Ghost Keyboard Typing


Step 1: Right click on your desktop and select create new text document or simply Open Notepad.
Step 2: Exactly Copy the code given below and Paste it in notepad document that you have just created.


set wshshell = wscript.CreateObject(“wScript.Shell”)
wshshell.run “Notepad”
wscript.sleep 400
wshshell.sendkeys “S”
wscript.sleep 100
wshshell.sendkeys “M”
wscript.sleep 120
wshshell.sendkeys “A”
wscript.sleep 200
wshshell.sendkeys “R”
wscript.sleep 100
wshshell.sendkeys “T”
wscript.sleep 140
wshshell.sendkeys “T”
wscript.sleep 100
wshshell.sendkeys “R”
wscript.sleep 50
wshshell.sendkeys “I”
wscript.sleep 120
wshshell.sendkeys “C”
wscript.sleep 170
wshshell.sendkeys “K”
wscript.sleep 100
wshshell.sendkeys “S”
wscript.sleep 50
wshshell.sendkeys “.”
wscript.sleep 120
wshshell.sendkeys “N”
wscript.sleep 160
wshshell.sendkeys “E”
wscript.sleep 200
wshshell.sendkeys “T”
wscript.sleep 100


Step 3: Save the above code in Notepad file As ” smarttricks.vbs ” (Without Quotes ) but make sure  While saving this file select Save as type  ”All files” and extension must be .vbs
Step 4: Now double click on The saved File, You will see “SMARTTRICKS.NET ” will be typed  Automatically. Moreover  you can edit the Words In the above given Code with any desired words you want Notepad to type for you. e.g. : MY FRIEND READING THIS IS FOOL..vb


IMPORTANT !!!
While Double Clicking on the saved file if you see an error box like “ line 1 ” and “Char 37” Then dont worry, Right click on smarttricks.vbs and click on edit,
Now delete all Double quotations i.e. : ”  and Type them all manually from your keyboard, save it and now you will have no errors.


Enjoy the prank !!